Sunday, December 29, 2013

My Love

Happy Sunday!!
 
Hope your Christmas was a great one.  Ours was very pleasant.  The kids were content with what Santa brought them,, and Hubby loves his gift too.  ;-) 
 
Now, it's time for a new challenge over at Red Carpet Studio


Our Wonderful Sponsor

https://www.facebook.com/SparklySweetCraftNotions
 
 
Our theme this challenge is to create a project with something NEW.  If any of you are like me, you have LOADS of NEW stuff...I just can't help myself when buying crafty supplies.  :-)
 
My NEW for this project are my Fiskars Fuse (used to emboss the blue paper), Distress Stickles for 'LOVE,' and a photo printer (this is the first picture to be printed from it).
 
 
My project is the first of many layouts to come.  My husband has been having some serious health problems over the last 18 months. He has been diagnosed with a virus, pneumonia (twice), possible fatty liver, etc...now we are exploring Cancer.  And from all the information, it could be advanced.  :-(  He was diagnosed with Hodgkin's Lymphoma in 2000.  Thankfully it was caught very early, and he was able to beat it then.  But this time, it's more serious.  And we have three babies that have been placed in our care.  We NEED Daddy for a very long time. 
 
My New Year's Resolution is to document my hubby and his impact on our lives.  I am going to document daily things.  Small things like sitting on the couch with our 3 year old......sitting in the chair hogging the TV.....working around the house on my Honey-Do-List.   But I am also going to go through our box of photos and make up a book or two for the kids to learn who Daddy was before their arrival.  :-) 
 
My layout was inspired by a Scrapbook Etc Sketch, Navy colors, and the New Year.  My husband is a very proud US Navy Veteran, hence the blue and white colors.  If he could live on the Sea, he would without a second thought.  The New Year is the metallic colors and Stickles.   
 
The photo is from our trip to Denver, CO.  Hubby was heading to a work conference.  I had never been west of the Mississippi.  Well, I tagged along.  It was wonderful!  This picture was taken on our way to Boulder for the day.  I personally don't like the photo...I have REALLY big hair....but if I only used photos I liked, I'd never scrap any of myself.  :-D


Now, I KNOW you have something new laying around....when you find it, create your project and link it up HERE


Happy New Year!!!


Monday, December 23, 2013

My Present

Merry Christmas!
 
Today is my post over at Get Inky!  Our theme is Winter Snow!
 
First thing I thought of, living in the Midwest, is SNOWMEN!  I love snowmen.  Our home probably has more snowmen out for decoration than Santa or Nutcrackers.  And if you know me at all, it is very difficult to have more of anything than Nutcrackers.  :-) 


There is a story behind this tag.  :-)   When the challenge came up, I wasn't sure what to create.  Of course it had to have a snowman..but in what way....

So....I thought I could create a tag.  I love making tags for my family's Christmas presents...they are cute, personal, and the kids LOVE that I do that.  But this tag is different, it's for MY present.  My husband and I have been married for long enough that unless you go and buy something big, such as a recliner or new windows, you can't really surprise the other person.  So this year, I thought about what I would like to have....and ordered it (after I looked around for the best deal...and where I could get add-ons cheaper than if I ordered any separate, and told my husband what I was doing).   The package came and it's quite heavy (it's a crafty machine, of course).  Since my husband just had surgery for biopsies (yes, multiple), he was unable to lift the box to wrap.  That means I wrapped it.  I thought it needed something... But of course, a tag!!  The ideas was rooted....and perfect for this challenge. 

And since the wrapping paper I chose had red, gold, and green...it fit the current Peachy Keen Stamps photo challenge too.
 
 
http://www.peachykeenstamps.com/forums/topic/peachy-keen-challenge-13-50-photo-inspiration/

With that in mind, I headed to my craft room - the dining table.

To create the base of the tag, I used Scraptastical Kreations' Element Me This file and green cardstock.  The edges were inked with Evergreen Bough Distress Ink.
 
I used Versamark ink and the GI 2013 Holiday Stamp set.  The mask technique was used to create the tree line.  For the ground, I tore a piece of paper and traced with an embossing pen. 
 
 
I used a white gel pen and a Spica glitter pen to accent the trees and give them a bit of dimension.
 
 
I stamped the holly leaves and berries (from the stamp set) on the top half in Versamark ink and highlighted with a Spica Glitter Pen.
 
 
The buttons on the snowman were created with the 'reindeer nose' from the stamp set.  I colored them with an Evergreen Bough Distress Marker and added the 'holes' with a white gel pen. 
 
 
The snowman was created with a file I purchased in the Sil store and cut with my Cameo.  The cute face is a stamp from PK 520 Stamp Set - Winter Face Assortment by Peachy Keen Stamps.  I stamped it in Versamark and heat embossed with Zing embossing powder in black.  His nose was 'colored' with Pumpkin Liquid Pearls.  His pipe was finished using Hot Cocoa Liquid Pearls.  A bit of blush (dry chalk) to his cheeks too.  For the final touch, I added some Frosted Lace Stickles to his hat.   


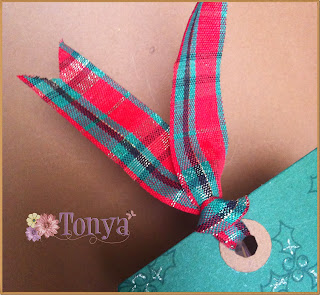
The ribbon is from my stash (Hobby Lobby purchase).  It has the perfect color combo for this (red & green with gold strands). 
 
 
I think it turned out great.  Looks wonderful on my package.  :-)
 
 
Merry Christmas to all of you from all of us.


Saturday, December 21, 2013

Christmas Tags

Happy First Day of Winter!
 
We are expecting a snow storm tomorrow.  But I live in the Midwest.  It's just another day for us.  :-)
 
So, while I'm making my grocery and household needs list, I wanted to take a few moments to share with you some cute little tags that I created to spruce up my family's presents. 


I used Scraptastical Kreations' file, Totally Christmas Squares.  I do not do 'project life' type memory books (yet).   But I love the size and dimension that this file gives for becoming tags. 
 
I separated the part in the my Silhouette Software.  I then cut the shapes our of cardstock and patterned paper. 
 
The stocking I added liquid applique and heated with my heat tool to give it dimension.  While the applique was still warm, I added Crystal Stickles.  I also added liquid applique to the Gingerbread man with a Peachy Keen face stamp.  The tree was simply dressed with twine from my stash.  The to/from is also a Peachy Keen Stamp.  
 
To finish them off, I added eyelets and twine for attaching to the present. 
 
I must say they look adorable on the gifts. 


Challenges

Friday, December 20, 2013

Cuttin’ and Stampin’ DT Call 2014

Merry Christmas!!
 
 
Today's post is a showcase for the current Cuttin' and Stampin' DT Call. 
 
As many of you know, I am a SAHM mom, married to a Navy Veteran.  I LOVE being able to stay home and homeschool our youngest three (adopted) children.  We also have a teenager who attends the local high school, plus an older girl who is the mother of our BEAUTIFUL granddaughter.  My love with crafting started when I started creating lifebooks for the youngest children, to document their lives (individually) prior to becoming a wonderfully blessed part of our family.  While creating our oldest son's book, I was INSTANTLY hooked.  I had so much fun expressing my son's personality and the joy he was bringing to our lives in his book.  My husband witnessed the fun I was having and bought me my first Cricut....since then it has all been about crafting....what supplies do I want, what machines I have to HAVE.....You know the fever, right? 
 
Over the last two years, I have been fortunate to be a part of the following teams:
All that Stickles Blog (co-creator)
Get Inky Stamps (term ends Dec. 2013)
 
Guest DT


A few of my favorite projects....
 
http://scrappingfunwithtonya.blogspot.com/2013/10/all-that-stickles-linky-party.html
I created this banner for an All that Stickles Linky Party.  I had SO much fun with this.  I used Teresa Collins' new line, Masquerade Party, and the free Cricut cartridge (TC Chic & Scary) that was available in the Cricut Craft Room for Halloween.  (For the post, click HERE)
 
 
http://scrappingfunwithtonya.blogspot.com/2013/09/red-carpet-studio-challenge.html
This is just one of my favorite cards.  It is just so warming, I think.  I used a Scaptastical Kreations' File and a Mojo Monday sketch for my inspiration.  (Click HERE for the full post)
 
 
http://scrappingfunwithtonya.blogspot.com/2013/06/red-carpet-studio-graduation.html
This beautiful card was made with a family friend (my daughter's) who graduated from high school this past spring.  He is such a wonderful young man, and we wanted to be sure he knew how proud we were of him.  (For the full post, click HERE)
 
 
http://scrappingfunwithtonya.blogspot.com/2013/05/peachy-keen-stamps-3d-flowers-challenge.html
These were give card holders for my daughter's 1st grade teachers, as end of the year gifts.  She just loved giving them out.  :-)  (For full post, click HERE)
 
 
This layout was created with my little boy in mind.  He graduated from 4K and, as boys his age do, they LOVE robots.  I also used his favorite color, Red.  :-)  (Click HERE for the full post.)
 
I am looking forward to hearing from Cuttin' and Stampin' by January 17th. 


Wednesday, December 18, 2013

Merry Christmas and A Ginger

Happy Wednesday!
 
It's my day over at Get Inky Stamps
 
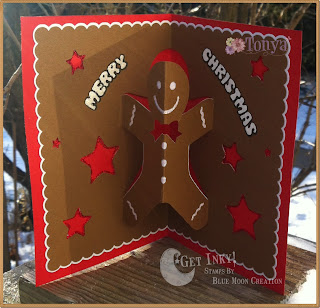
For my project, I created a Christmas card, using Blue Moon's Holiday 2013 Stamp set
 
 
I used a Silhouette file for the base of the card (the gingerbreak pop out).
 
Once the pieces were cut and assembled, I stamped the front with a star, from the Holiday stamp set, in Versamark Ink. 
The gingerbread man on the front of the card was stamped on Kraft cardstock, hand cut, and embellished with Liquid Applique. 

 
The inside of the card, was embellished with Stickles, of course. 


And once the Stickles were dry, Merry Christmas (also from the stamp set) was stamped, colored with white gel pen and Frosted Lace Stickles. 
 
My daughter saw the card and immediately took possession of it to give to her friend. 
How sweet is that? 


Monday, December 16, 2013

Santa Baby

Happy Monday!
 
It's almost Christmas!  Woo Hoo!  My babies start their holiday break from school this Friday.  I love having them home every day.  Everyone in their pajamas, because there's not one place we have to be. 
 
Speaking of Christmas, I wanted to share with you a Christmas card I created for this week's Peachy Keen Stamps challenge.  The challenge theme is Just Cards: Glitter
 
It took me a few days to come up with an idea for this challenge.   Glitter?  I put glitter on everything!  :-)  Especially since I am part of the wonderful blog All that Stickles
 
Then I pulled up Mojo Monday and their sketches....and Voila!!  An idea.  :-)
 
 I just love how this card turned out.  Blue is not a typical color for me.  My mother (who loves blue), as well as the sketch, was my inspiration for my card.  


I used PKS's Candy Stripe Background stamp on the large blue mat.  I stamped with Versamark and heat embossed with a Recollections Sparkly powder. 
 
The 3 strips were placed together and stamped with the holly leaves/berries from the November 2012 SOTM set.  Then they were adhered spaced apart. But with the stamps, it gives a continual look to the eye. 
 
The Santa is from PKS Santa Stamp Set.  I cut the circle from Xpress cardstock, then stamped the Santa face image, with his beard off the circle.  He was colored with Copics, and his hat trim was highlighted with Diamond Stickles. 
 
The patterned papers are from Bo Bunny's Elf Magic paper pad


The inside of the card was stamped with a sentiment from the November 2012 SOTM set.  Another bit of inspiration from my mother.  (If you knew my mother, you'd completely understand.)  :-)
 
I added a holly sticker with pop dots from a page kit that I picked up from Hobby Lobby last season. 


Sunday, December 15, 2013

All that Stickles "Sweet & Sparkly" Blog Hop

Click HERE for RCS Challenge

Welcome to the Sweet & Sparkly Blog Hop brought to you by the All that Stickles design team!


The holidays are just around the corner, and the ATS design team has put together some fabulous, sparkly projects to help get in the holiday spirit!


If you've come from the All that Stickles' blog, you're in the right place.

 
For my project, I created a wreath for one of our interior doors.

(sorry about the picture.  I couldn't get a clearer one because it's snowing here.)


When we came up with the theme to the hop, I immediately thought of the PKS JULY SOTM stamp set (and add-ons).   
 
So I set to cutting all the shapes out with my cameo, the matching SVG files, and Xpress cardstock.  It took me three days to color all the images with copics, in between all the family obligations.  :-) 
 
 
I added some liquid applique and sparkly embossing powder to Santa and the Gingerbread cottage for some interest.
 
 
To accent the images, I added Cranberry, Yellow, Xmas Red, Green, Cotton Candy, Holly, & Candy Cane Stickles. 
 
 
A bit of twine for the train connectors. 


We have blog candy for those who are a follower of All that Stickles and leave a comment on every stop of the hop! Winners will be announced Wednesday December 18th at All that Stickles.

$25 Gift Certificate
$15 Gift Certificate


10 Digital Stamps of Winner's Choice


$15 Gift Certificate

Your next stop is Laura's blog.

Here's the complete lineup:

Thanks for hopping! :) Don't forget to check out our Happy Holidays Linky Party!


"How the Grinch Stole Christmas" Challenge

Merry Christmas!
 
It's time for a new challenge at Red Carpet Studio Challenge.
 
For this challenge, our DT is teaming up with Stuck?! Sketches challenge blog
 
Theme of our challenge is......
 "How the Grinch Stole Christmas" 
(Use a Christmas tree on a scrapbook layout inspired by the following sketch)


Here's my layout.................
I stayed pretty true to the sketch..... 
To create and cut each piece, I put the sketch in my Silhouette software and 'created' the pieces. 
 
I used Bo Bunny's Mistletoe Paper Collection.  I LOVE this paper pad.  I have been so afraid to use the paper and waste it..so I've been holding on to it since last Christmas season.  :-)   Thought I'd pull it out and cut it up. 
 
 
The chevron paper was misted with Perfect Pearls Mist. 


The main tree was pieced with three layers, the center one being white cardstock. 
The tree was highlighted with a Spica pen and gems from a page kit from Hobby Lobby.


 The accent tree were cut from white cardstock and colored with Distress Inks (Evergreen Bough and Iced Spruce), and misted with the same Perfect Pearls mist while the ink was wet.  The mist gave the trees a 'icy' textured look.
 
This layout will be put in our family book with this year's picture of the kids with Santa. 


Saturday, December 7, 2013

Hang It on A Tree

For the All that Stickles Linky Party, click HERE

Merry Christmas!!
 
I have been trying to decorate the house like a mad woman before the month of December gets away from me.  One thing I dislike greatly is to decorate and feel like it's time to un-decorate shortly there after. 
 
For example, we decorate a real tree (that we cut down from a local tree farm) plus 8 artificial trees (6 & 4 ft) around the house.  I like to get them up within a week of Thanksgiving so that the fruits of my labor are thoroughly enjoyed before the New Year comes and goes, and it's time to take all the decorations down.
 
The tree that I put up in the dining room is a bit bare.  My husband and I thought it would be fun to create homemade ornaments with the kids for it. 
 
And then Peachy Keen Stamps posted their current challenge.....
 
 
What a COINCIDENCE!!
 
So to get us started on our little creation fest with the kids, I created this little beauty.


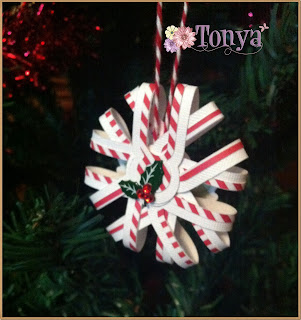
I used a Jamie Cripps Silhouette File for the snowflake.  I used the PKS July SOTM and coordinating SVG kit for the holly & berries.  I cut the base layer of the snowflake and holly/berry shape from white textured cardstock.  
 
 
I colored the image with copics (berries - R14, R39, R89/holly - G12, G24, G46) 
I put it on a foam square and placed it in the middle of the snowflake. 

To coordinate with the PKS image, I used a mistletoe brad (from Hobby Lobby) to form the base shape of the snowflake, that is visible on the backside of the ornament.
 
 
Supplies:
White cardstock
Snap paper pad (patterned paper)
Copics
PKS SOTM set
SVG for SOTM set
Brad
Twine